Skip to content

May 2026

A fitness tracker for Obsidian

I don't really enjoy the gym. I suppose that perhaps my fascination with biology ends at the cell membrane, because the jargon of muscle groups and their biomechanics to makes my eyes glaze over and my brain scramble for the exits. Fortunately for me, my wife, who took a minor in anatomy as part of her biology degree and actually enjoys the gym, was kind enough to design a routine I can follow without having to think about it too hard. She wrote down the location of the machine, the settings, and the goofy motions I'm supposed to perform with it. I just do the thing, and when it starts to feel easy, I cross out the number in front of "kilograms" and write in the next bigger number on the machine. I don't think I'd have been able to get started without her simplifying it for me! Her gym routine notes looks like the maintenance schedule of a high performance military aircraft to me.

Anyway, eventually the list she wrote for me turned into Obsidian note, and usual thing started to happen. It became a checklist. Then I started automating adding new checkboxes for each workout. The automation started to get more elaborate. After two years of embroidery, it's basically grown into a fitness tracker app. I decided to tidy it up and share it.

So, this is a workout tracking system for built around a single hub note. I designed this with these ideas in mind :

  • I don't want to think about anything while I'm at the gym. I just want to check off tasks.
  • I don't want to spend a lot of planing. I just want to put the numbers into a table.
  • When I make charts and stats, I want them to update automatically when I finish a workout.

So, it my tracker works like this : Press a button to create a workout note pre-filled from your current targets, check off exercises as you go, press a button to finish. The scripts create new workouts based on whatever is in the workout table and writes structured frontmatter into each workout note automatically so the history is queryable with Dataview and Charts.

You can get code from the Github repo.

It's automated enough to make routine days easy, but flexible enough not to make struggle days worse.
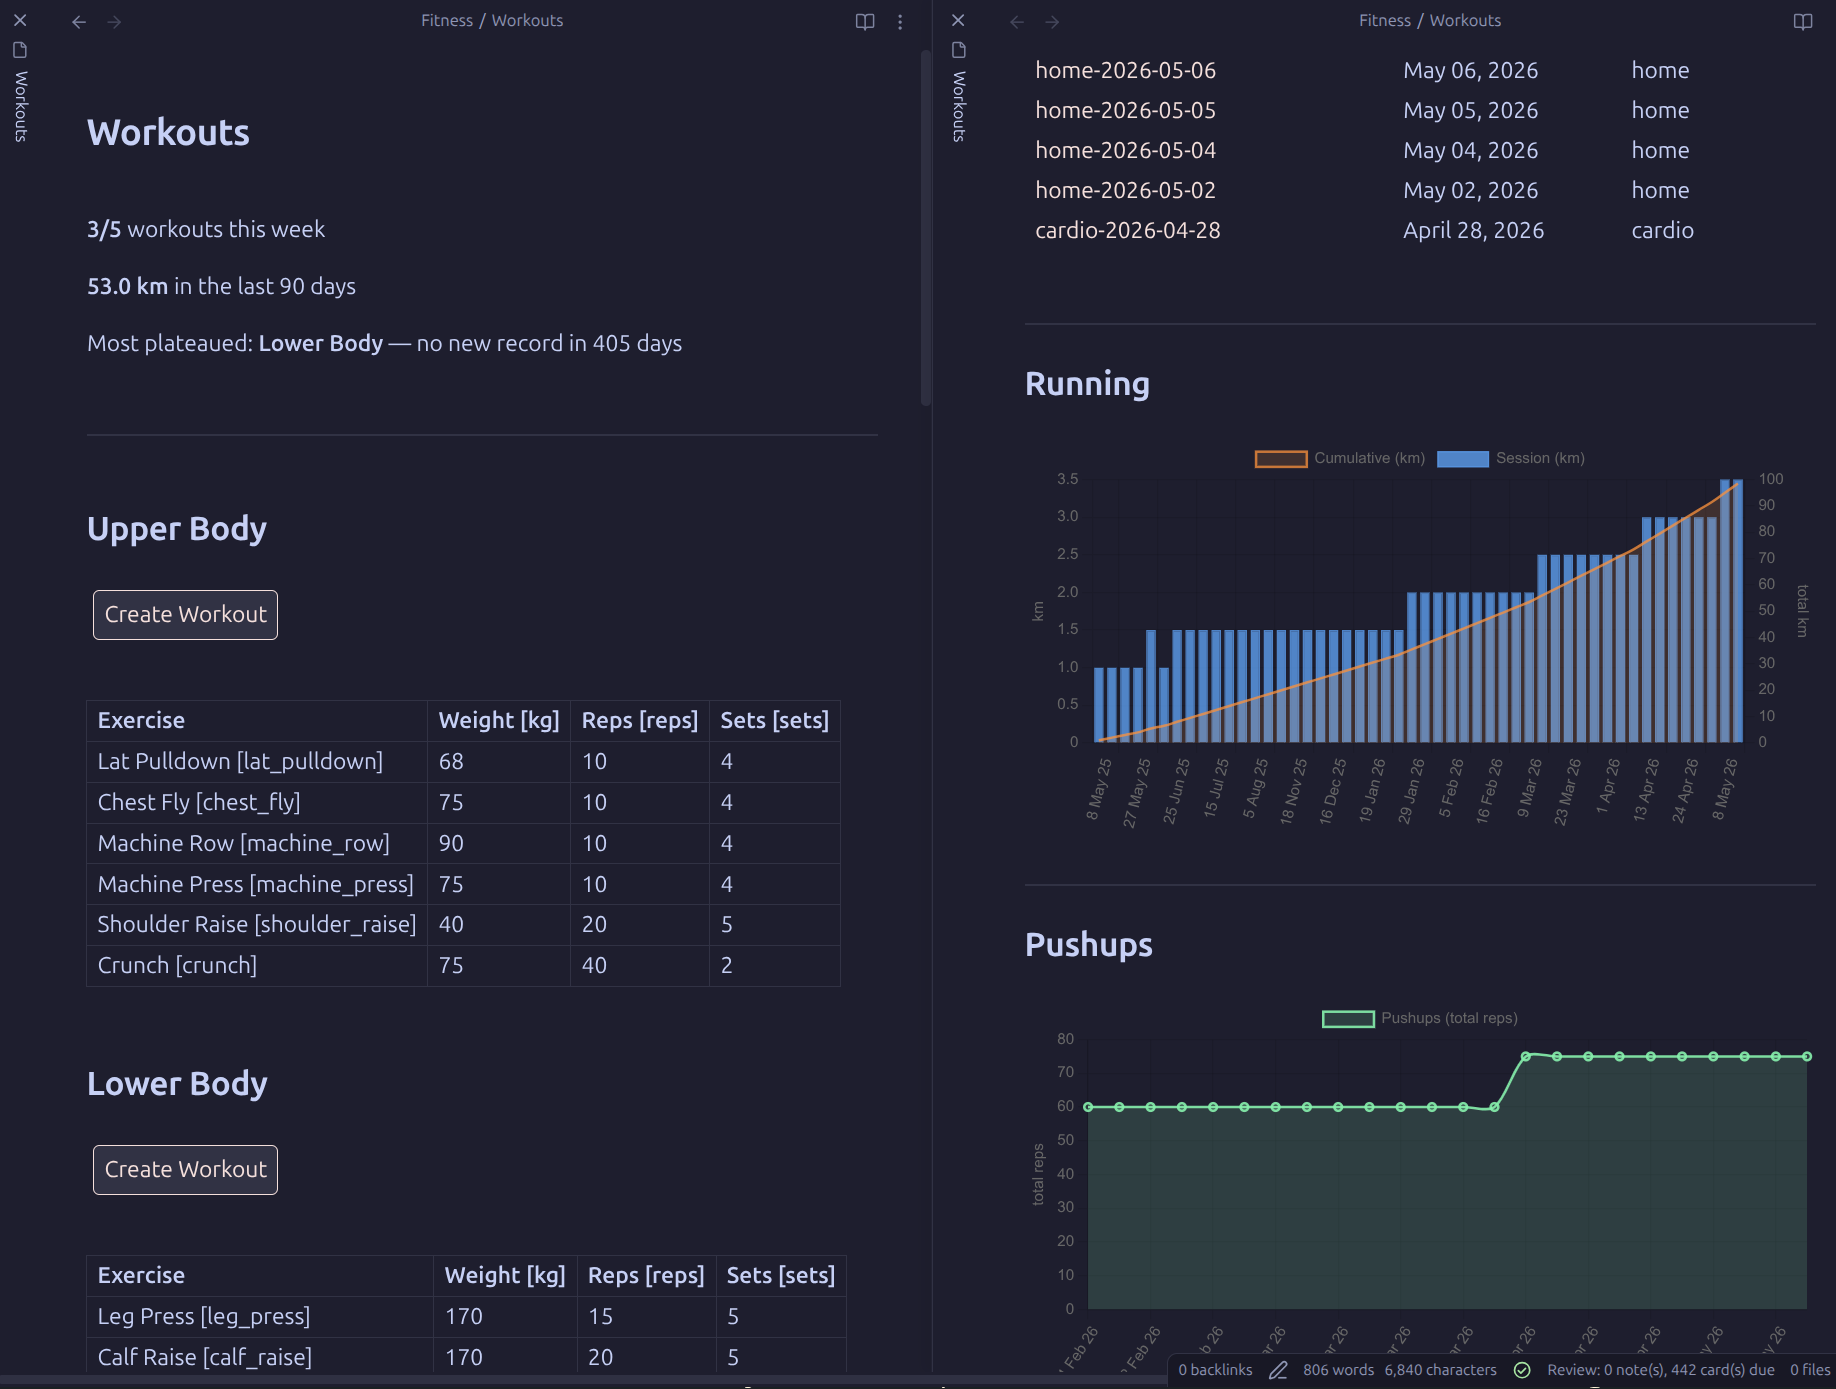
hub-note.png The hub note — session count, running total, and plateau alert at the top; one button per workout type; progress charts below.

Plugins

Plugin Author Purpose
Dataview blacksmithgu Querying workout history; rendering charts via DataviewJS
Templater SilentVoid13 Running the create/finish scripts
Buttons shabegom One-tap workout creation from the hub note
Tasks obsidian-tasks-group Checkbox state tracking and completion timestamps
Charts phibr0 Rendering progress charts

All are available in the Obsidian Community Plugins browser.

Dataview

  • Enable JavaScript Queries — on (required for DataviewJS blocks and charts)
  • Enable Inline Queries — optional, not used by this system

Templater

  • Template folder location — set to your Templates/ folder
  • Script files folder location — set to Templates/Scripts/
  • Trigger Templater on new file creationon (this is what fires the create script when the Buttons plugin creates a new note)

Buttons

No special settings required beyond installation.

Tasks

No special settings required. The system uses [x] / [-] checkbox states and the ✅ YYYY-MM-DD completion stamp that Tasks writes automatically.

Charts

No special settings required beyond installation.

Installation

Fetch the code from the Github repo. You can clone it directly into your vault directory, and it should just work.

  1. Copy the following into your vault, preserving the folder structure :
Fitness/
  Workouts.md
  Workouts/          ← workout notes are created here automatically
Templates/
  Create Upper Body Workout.md
  Create Lower Body Workout.md
  Create Cardio Workout.md
  Create Home Workout.md
  Scripts/
    createWorkout.js
    finishWorkout.js
  1. Install and enable all five plugins listed above.
  2. In Templater settings, set Template folder to Templates/ and Script files folder to Templates/Scripts/.
  3. Enable Trigger Templater on new file creation in Templater settings.
  4. Open Fitness/Workouts.md. The three bold summary lines at the top will populate once you have workout notes in the folder.

Designing workouts

All workout types are defined in Workouts.md. Each type is a ## section containing a table of exercises. Add a row to the table in the relevant section. The column header format is :

| Exercise | Weight [kg] | Reps [reps] | Sets [sets] |

The bracketed annotation ([kg], [reps], etc.) defines the frontmatter key suffix that will be written for that column. The first column is always the exercise name, and its bracketed annotation is the exercise key used throughout the system:

| Lat Pulldown [lat_pulldown] | 68 | 10 | 4 |

Blank cells produce no frontmatter key, which is how optional columns work (e.g. Planks has a duration but no reps).

To add a new workout type :

  1. Add a new ## section to Workouts.md with a table following the format above.

  2. Create a one-line shim template in Templates/ named Create <Type> Workout.md :

<%%* tR += await tp.user.createWorkout(tp, 'Type Name') -%%>

where 'Type Name' exactly matches the ## heading in Workouts.md.

  1. Add a button to the new section in Workouts.md:
```button
name Create Workout
type note(Fitness/Workouts/<type-name>) template
action Create <Type> Workout
templater true
```

The filename prefix is derived automatically from the section heading ('Lower Body'lower-body). createWorkout.js renames the placeholder file to the correct dated name (e.g. lower-body-2026-05-14.md) before writing any content, so no date expression is needed in the button.

Columns and units

The unit in each column header becomes part of the frontmatter key :

Header Key suffix Example key
Weight [kg] _kg lat_pulldown_kg
Reps [reps] _reps lat_pulldown_reps
Sets [sets] _sets lat_pulldown_sets
Distance [km] _km running_km
Speed [km/h] _km_h running_km_h
Duration [s] _s planks_s

Slashes in units are converted to underscores (km/hkm_h).

How to do a workout

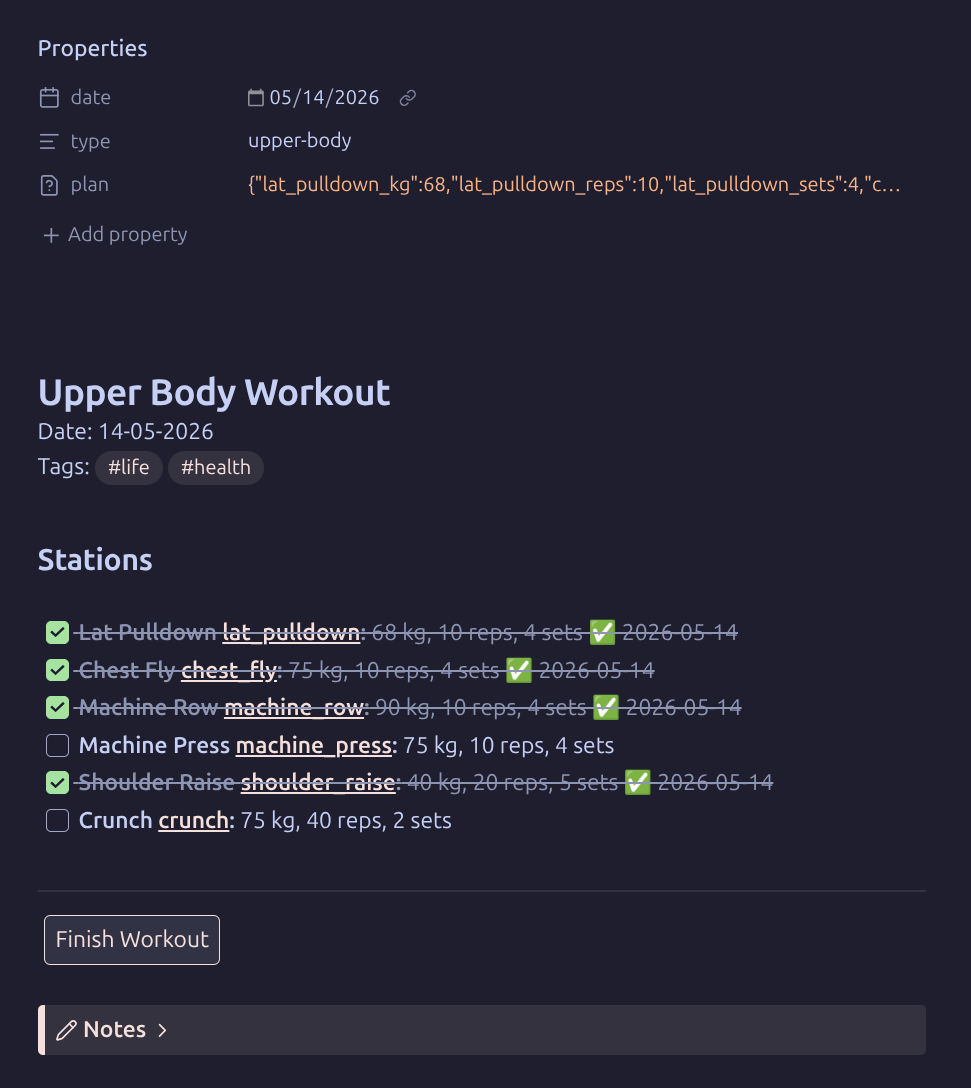
  1. Open Fitness/Workouts.md and press the Create Workout button for the type you want. A new dated note is created in Fitness/Workouts/ and opened automatically.

workout-in-progress.png A freshly created workout note — each station pre-filled from your current targets in Workouts.md.

  1. Work through your exercises. Each station is a checkbox pre-filled with your target values :
- [ ] **Lat Pulldown [lat_pulldown]:** 68 kg, 10 reps, 4 sets

Check the box when done. If you deviated from the target (different weight, fewer sets), edit the values on the line before checking.

  1. When finished, press Finish Workout. The script:

  2. Reads every checked item and writes the actual values to done: frontmatter

  3. Marks any unchecked items as [-] (cancelled)
  4. Expands the Notes callout and records any deviations from plan: or cancelled exercises

The plan: frontmatter (written on creation) records what you intended. The done: frontmatter (written on finish) records what you actually did. Differences between the two are deviations.
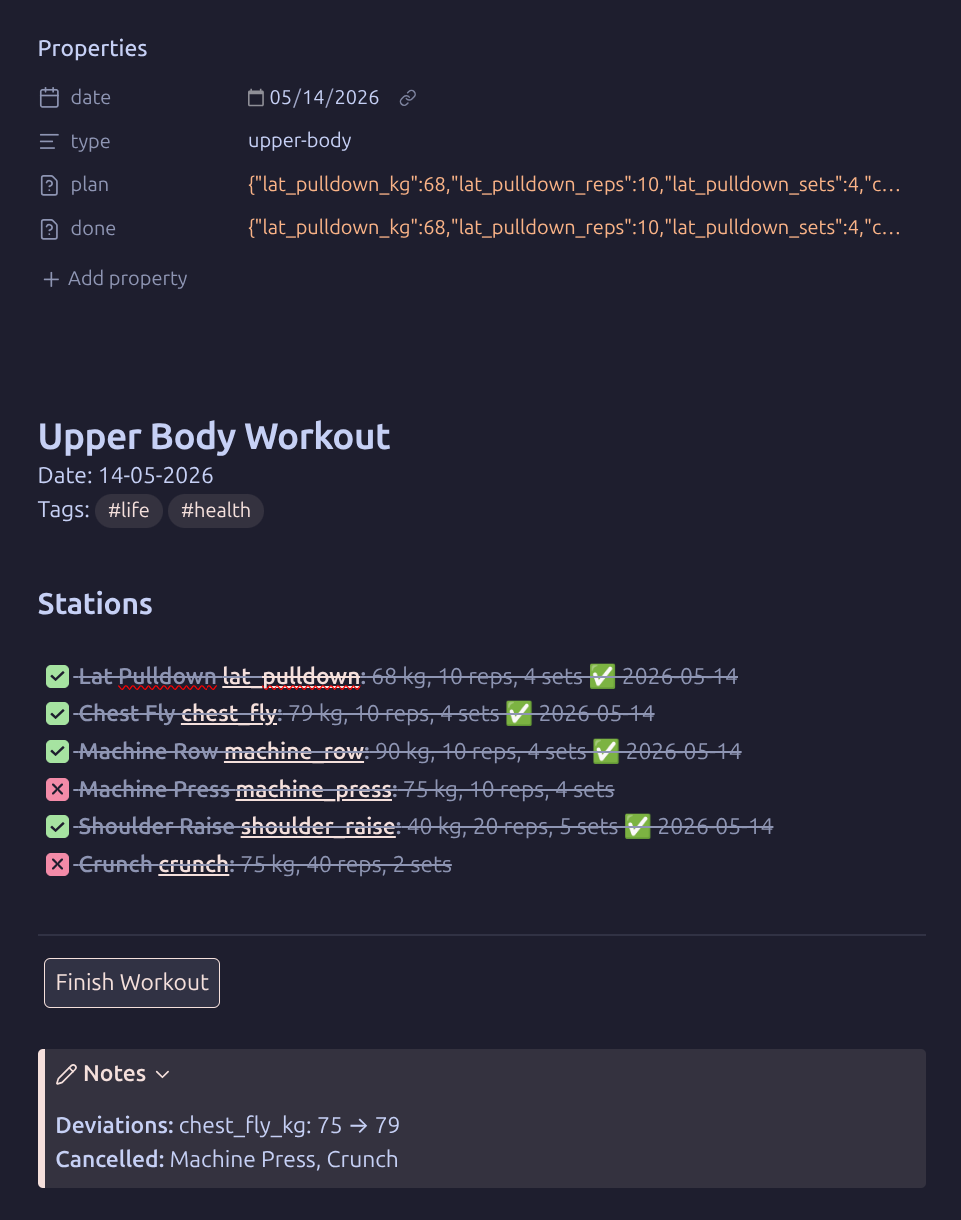
workout-finished.png After pressing Finish Workout — checked items are written to done: frontmatter, cancelled items marked [-], and any deviations summarized in the Notes callout.

Frontmatter structure

The metadata is created automatically, so you don't have to actually do anything for this to work. Each workout note has this structure :

---
date: 2026-05-14
type: upper-body
plan:
  lat_pulldown_kg: 68
  lat_pulldown_reps: 10
  lat_pulldown_sets: 4
  chest_fly_kg: 75
  ...
done:
  lat_pulldown_kg: 70      # you went heavier
  lat_pulldown_reps: 10
  lat_pulldown_sets: 4
  chest_fly_kg: 75
  ...                      # cancelled exercises are absent from done:
---
  • type is the kebab-case prefix derived from the section heading
  • plan is set on creation; done is set on finish
  • A key present in plan but absent from done means that exercise was cancelled
  • A value in done that differs from plan is a deviation

Querying data with DataviewJS

Because each workout has its data encoded in the YAML frontmatter, it is pretty easy to query using DatavewJS. The basic pattern for querying looks like this :

const pages = dv.pages('"Fitness"')          // all notes in Fitness/ and subfolders (recursive)
    .where(p => p.type === "upper-body" && p.done)
    .sort(p => p.date, "asc")
    .array();

Nested YAML objects (plan:, done:) are accessible as plain properties :

p.done.lat_pulldown_kg   // number
p.plan.lat_pulldown_sets // number

Some common patterns

All values for one exercise over time :

pages.map(p => ({ date: p.date, kg: p.done.lat_pulldown_kg }))

All-time PR for a field :

Math.max(...pages.map(p => p.done.lat_pulldown_kg ?? 0))

Total volume (reps × sets) per session :

pages.map(p => Number(p.done.pushups_reps) * Number(p.done.pushups_sets))

Cumulative total :

let cum = 0;
const cumulative = values.map(v => (cum += v));

Sessions in the last N days :

const cutoff = dv.date("today").minus({ days: 90 });
dv.pages('"Fitness"').where(p => p.date >= cutoff)

Rendering a chart

To render a chart, pass a Chart.js config object to window.renderChart() :

window.renderChart({
    type: "line",
    data: {
        labels: pages.map(p => p.date.toFormat("d MMM yy")),
        datasets: [{
            label: "Distance (km)",
            data: pages.map(p => p.done.running_km),
            borderColor: "rgba(37, 99, 235, 0.9)",
            backgroundColor: "rgba(37, 99, 235, 0.15)",
            fill: true,
            tension: 0.3,
            pointRadius: 3,
            borderWidth: 2
        }]
    },
    options: {
        scales: {
            y: { min: 0, title: { display: true, text: "km" } }
        }
    }
}, this.container);

Tips :

  • Use rgba() for colors — CSS variable approaches are unreliable in DataviewJS context
  • Check document.body.classList.contains("theme-dark") to pick light/dark variants
  • For dual-axis charts, assign yAxisID: "y" and yAxisID: "y1" to datasets and define both axes in options.scales
  • Set order: 1 on the dataset you want rendered on top (lower = on top)
  • pointRadius: 0 on lines with many data points avoids visual clutter
  • autoSkip: true with maxTicksLimit on the x-axis prevents label crowding

Back to the Future

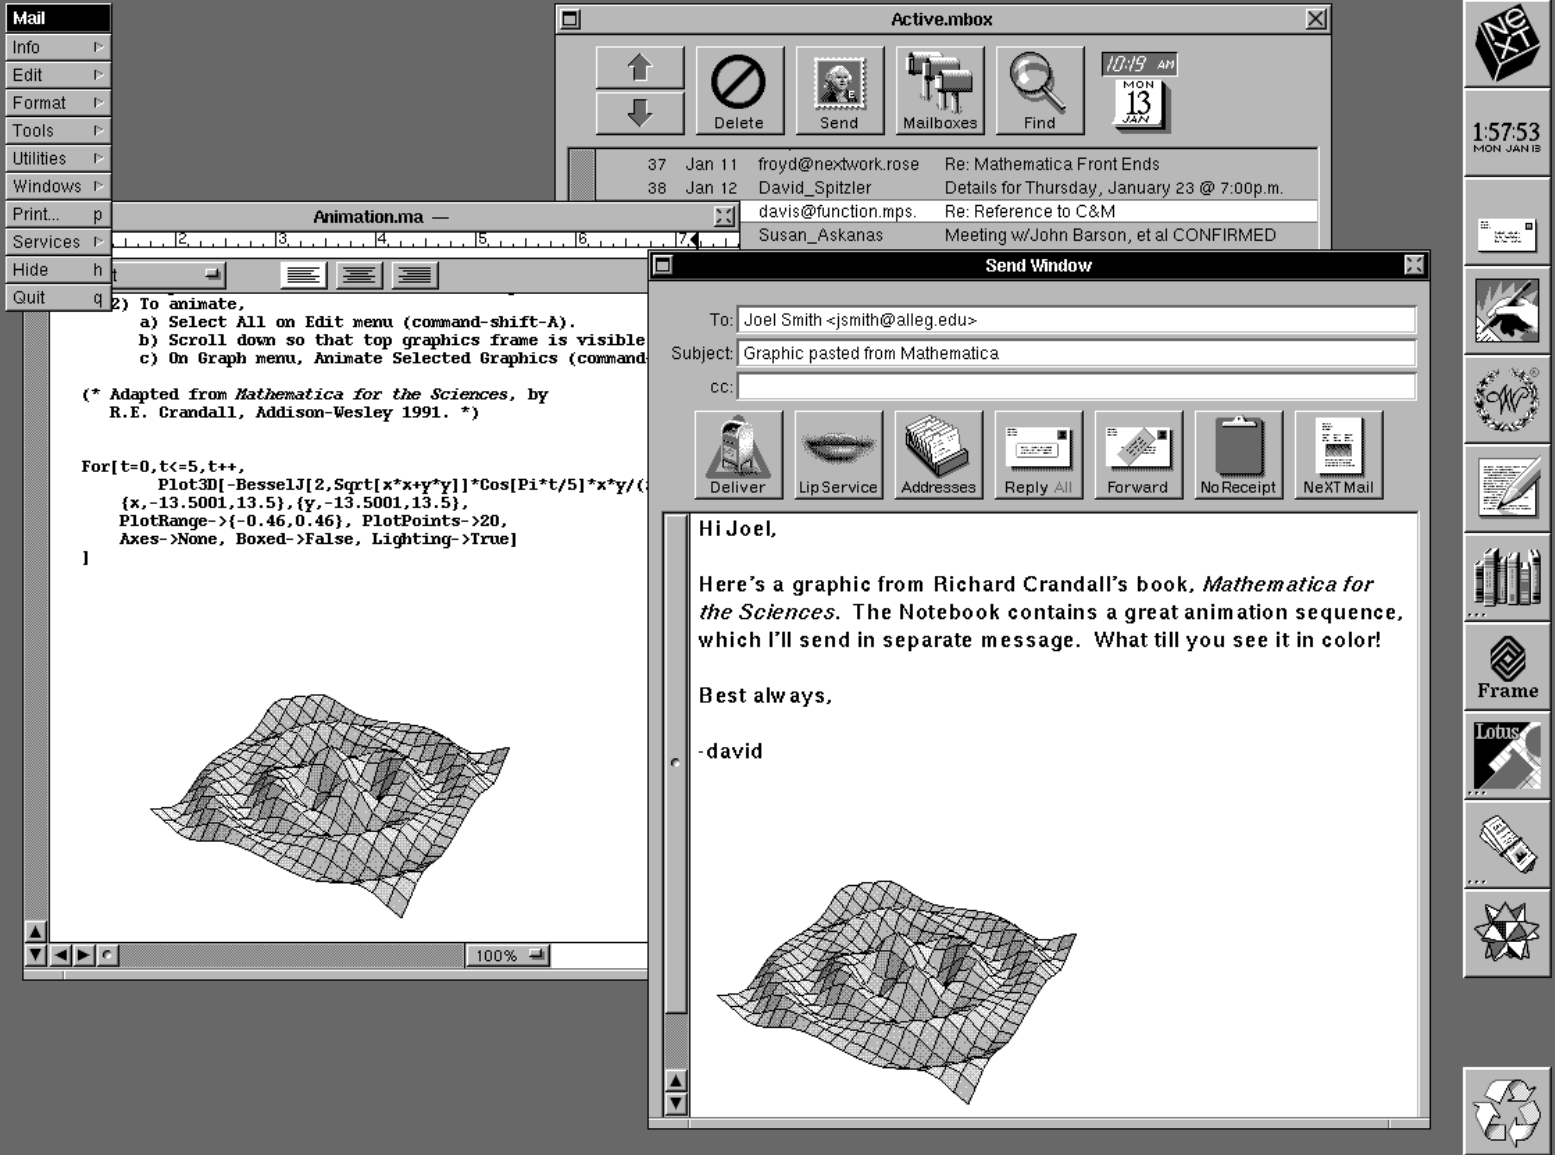
next_os_screenshot.png

I've had this blog for a long time. I set it up on October 1st, 2002. It's been 23 years, 7 months, and 18 days. That's more than half my life, and all of my life as an adult. Over the years, the internet has changed, and I gradually wrote less and less. Like everyone else, more of my attention has been absorbed by the big platforms. Like everyone else, I think I am worse for it.

For a while, some of those platforms actually did offer something of real value. A significant fraction of my scientific connections exist thanks to Twitter. I still find interesting research papers on Reddit. I even learn things from YouTube from time to time. Nevertheless, I can't help but feel that we're well beyond the point where the balance flipped. The platforms now take more than they give back.

One of the things I decided from the beginning is that I wasn't going to move it onto anyone else's infrastructure. It would have been much easier to move to Blogger, or WordPress, or Medium. I felt that it have been convenient, at least in the near term, but then again, I never had the sense that this thing exists to achieve a specific purpose. I have opinions, but I'm not a pundit. I'm glad you are here to read what I have to say, but growing an audience isn't something I've ever intended to try.

Like most people, a chunk of my life happens to be on the internet. In a sense, my little server is my home on the internet, and so the blog is some combination of my front porch and my university office. It's the curtliage of my personal and professional network. Nothing is for sale here, but I'm happy you came to visit.

While my mail server has been chugging along without complaints for more than twenty years -- with the same configuration files! -- the blog itself has been almost impossible to keep alive. Almost as soon as I have a shiny new tool up and running, the project maintainers abandon it, and it immediately begins to fall apart. This is the seventh or eighth complete rebuild. Self-hosting a blog is a lot like owning a British sports car. It's not something you do for practical reasons.

So, why? Well, it comes down to being able to say what I want to say. I suppose there is the potential for censorship, or some other kind of de-platforming to consider. Nothing I have to say is important enough, or frankly interesting enough, that I find myself strongly motivated by that particular concern. Censorship is something I mostly worry about on behalf of more interesting, more vulnerable people. What I mean is, if I want to tell you that the rate of growth of a population is proportional to its size, can I just say

$$ \frac{dP}{dt} = rP $$ without having to suffer through some barbaric ritual of clicking little icons in a toolbar somewhere? If I want to explain to you how a piece of code works, can I just show it to you?

while True :
    print( 'Please stop, I want to get out.' )

If I run the code, can I show you the results?

Please stop, I want to get out.

Jupyter Notebooks have been around for ages, and they do exactly this. They're the perfect tool for someone like me, whose research consists almost entirely of noodling around with messy data and half-broken software. I have hundreds of them cluttering my workstation. I want to be able to just take a notebook and stick it on my blog as an article.

In principle, this should be easy. Jupyter's nbconvert will render notebooks into Markdown or HTML, and there are lots of static site generators that will consume the output. The problem is that this only gets you about 90% of the way there. Markdown comes in different flavors, and so cleanup steps are required. Embedded media like plots have end up in silly places that don't follow the site generator's conventions, and there's no real namespace safety for media filenames preventing accidental overwrites. Once you've fixed that, you have to fix all the links in the document, and while you're doing that, you have keep in mind where all the files are going to land when the site is built. There is also the chore of adding article metadata to the notebook in a raw-format cell, which technically intriguing the first time you do it, and an infuriating chore on every subsequent occasion.

I made a tool called mkprof that automates most of this stuff. I made it for myself, with the intention of using it to post articles and notebooks without undue suffering. I thought perhaps other people might want something like this, and so it's available as a Python package on PyPi.

So, yeah. I'm going to try to spend more time making things, and less time consuming whatever is on the platforms. If you do the same, maybe I'll drop by your place and check out what you've decided to share.

Cheers.

Building Thread border router with an Espressif development kit

These are my notes for setting up a Thread border router based on the OpenThread stack using the Espressif Thread Border Router development board. This board is a weird little guy, with an ESP32-S3 and an ESP32-H2 grafted together on one board bridged by UART/SPI. The idea is that the S3 functions as the host and lives on your WiFi network (or Ethernet, if you buy the daughter board), and the H2 runs Zigbee or Thread and talks to the S3. It costs about $10 shipped. You can actually get the price even lower by plugging an ESP32-H2 directly into your Home Assistant host by USB-C and running the border router stack on the host. But, I think Espressif's dev board gives you the good parts of a stand-alone border router with a completely self-hosted, open source stack and zero ties to anyone's cloud service. As a smart person once advised me, let network stuff do network stuff, and let server stuff do server stuff; networking infrastructure should fade into the background and should be upgraded or replaced very, very rarely.

I paid 1,326円 to get mine from AliExpress.

It took me a couple of hours to get everything working, which could have gone a lot more smoothly if I'd been a little bit more methodical and a little less excited. These notes detail exactly what I did to get Matter over Thread working in Home Assistant running in a Docker container on my little home server, which runs Debian. I've removed all of my mistakes, swearing and confusion. If you're interested in replicating this setup, these notes should give you a straight shot from opening the box to commissioning your first Matter device in Home Assistant.


Prerequisites

You'll need this hardware :

  • Espressif ESP Thread Border Router board (ESP32-S3 + ESP32-H2)
  • Linux host running Home Assistant container and Matter server container
  • A WiFi network
  • An Android of iOS device running the Home Assistant companion app
  • A Matter device to test with

You'll also need these repos :


Part 1: Building and Flashing the Firmware

1.1 Install esp-idf v5.5.4

The esp-thread-br project requires esp-idf v5.5.4. The 6.x series has API changes that break the build. This will require about 3.8 GB after everything is downloaded and built.

git clone -b v5.5.4 --recursive https://github.com/espressif/esp-idf.git esp-idf-v5.5.4
cd esp-idf-v5.5.4
./install.sh
. ./export.sh

Note the leading . when sourcing export.sh. This script needs to be sourced, not just executed. Add an alias to your shell config for convenience :

alias get_idf='. ~/path/to/esp-idf-v5.5.4/export.sh'

You must source export.sh in every new terminal session before building.

1.2 Build the RCP firmware

The RCP (Radio Co-Processor) firmware runs on the ESP32-H2. It must be built before the main border router firmware, as it gets bundled in and flashed to the H2 automatically on first boot. Think of this as the "baseband" for this device, if you like.

cd esp-idf-v5.5.4/examples/openthread/ot_rcp
idf.py set-target esp32h2
idf.py build

1.3 Clone esp-thread-br

This is the firmware for the ESP32-S3, which is what we'll actually be interacting with. This repo will take up about 1.2 GB once everything is downloaded and built.

git clone --recursive https://github.com/espressif/esp-thread-br.git
cd esp-thread-br/examples/basic_thread_border_router

Use the basic_thread_border_router example. The ot_br example from esp-idf is a simpler standalone example without the full partition table (OTA, rcp_fw) we need for this board.

1.4 Configure

idf.py set-target esp32s3
idf.py menuconfig

Key settings to configure. It's kind of amazing how capable the ESP32 platform is, and so I think it is pretty interesting to explore the features in the menuconfig TUI. It is a bit overwhelming though, so you can also use / to search each symbol by name) :

Symbol Setting
EXAMPLE_WIFI_SSID Your WiFi network name
EXAMPLE_WIFI_PASSWORD Your WiFi password
OPENTHREAD_BR_AUTO_START Enable
OPENTHREAD_BR_START_WEB Enable (web UI)
ESPTOOLPY_FLASHSIZE 8MB
OPENTHREAD_CLI_WIFI Disable (conflicts with auto-start)
OPENTHREAD_CSL Disable (causes linker errors)
OPENTHREAD_MAC_FILTER Enable (recommended for security)
OPENTHREAD_DIAG Consider disabling for production

There are various ways to get your WiFi credentials set up, but unfortunately there are some compile-time conflicts. The path of least resistance is just to bake them into your firmware image.

1.5 Build and flash

The board has two USB-C ports. One is for the ESP32-S3 (host), and one for the ESP32-H2 (RCP). Flash the main firmware via the S3 port :

idf.py build flash monitor

The H2 will be flashed automatically from the bundled RCP firmware on first boot. If you see RCP-related crashes, flash it manually via the H2 port :

cd esp-idf-v5.5.4/examples/openthread/ot_rcp
idf.py -p <H2_port> flash

To exit the monitor: Ctrl+]


Part 2: Configuring the Thread Network

If you built the web admin interface into your firmware, you can see a lot of cool diagnostic information. However, I found that some key settings do not actually stick if you enter them by the web admin interface, and it will sometimes show the default values for things like the network name even if you've set them correctly. Treat information reported by the console interface as the actual truth.

2.1 Verify the border router is up

Now that the board is flashed and booted, we'll have to configure it. Connect to the ESP32-S3 console and check the Thread state :

ot state

If it shows disabled, bring the interface up :

ot ifconfig up
ot thread start

Wait a few seconds. It should transition to leader.

2.2 Generate a fresh dataset

The default dataset ships with dummy values that must be replaced :

ot dataset init new
ot dataset networkname <your-network-name>
ot dataset commit active
ot thread stop
ot thread start

Verify the new dataset :

ot dataset active

Confirm the network key is not 00112233445566778899aabbccddeeff and PAN ID is not 0x1234.

2.3 Useful CLI commands for monitoring

ot neighbor table           # see connected Thread devices
ot router table             # see Thread routers
ot netdata show             # see advertised prefixes and services
ot srp-server host list     # see registered SRP hosts
ot srp-server service list  # see registered services

Part 3: Home Assistant Integration

3.1 Install required integrations

In Home Assistant, install :

  • Matter integration
  • Thread integration
  • OpenThread Border Router integration

There are a couple of ways to set this up, but I'm running the The Open Home Foundation Matter Server in a Docker container.

3.2 Add the border router

In Home Assistant, go to Settings → Devices & Services → Add Integration → OpenThread Border Router, enter :

http://<border-router-ip>:80

Or, it's probably more likely that Home Assistant will see that there's a Thread Border Router advertising itself on your network and offer to set it up. Once you've added the border router, go to the Thread integration → Configure and set the ESP border router as the preferred network.

3.3 Sync Thread credentials to your phone

Before commissioning any Matter devices, sync the Thread credentials to your phone via the Home Assistant Companion app :

Android: Settings → Companion app → Troubleshooting → Sync Thread credentials

This step is important! Without it, Matter commissioning will fail with a misleading "your device requires a Thread border router" error even though the border router is working correctly. You only have to do this once, though.


Part 4: IPv6 Routing on the Linux Host

This was actually the most troublesome part of the whole process. The Matter server needs IPv6 connectivity to the Thread network prefix in order to commission devices. But, Matter is running in a Docker container, and it's fairly unlikely that the network plumbing is set up correctly to allow the container to hear IPv6 Router Advertisements on the host's physical network port. By default, Linux ignores Route Info Options in Router Advertisements when IPv6 forwarding is enabled, which prevents the Thread prefix route from being installed.

So, we'll have to re-plumb things for IPv6 a little bit.

4.1 Verify the problem

Check if the Thread prefix route is present :

ip -6 route | grep <thread-prefix>

You should able to see your border routers's IPv6 prefix in the ESP32 console messages, or by running ot netdata show.

If it's missing, check what RAs are arriving :

sudo tcpdump -i enp1s0 -vv icmp6 and ip6[40] == 134

You should see RAs from the border router advertising the Thread prefix as a route info option.

4.2 Fix: accept Route Info Options

Linux requires accept_ra_rt_info_max_plen to be set to a non-zero value to process route info options from RAs. Also, accept_ra=2 is needed when IPv6 forwarding is enabled (which Docker enables).

To apply immediately :

sudo sysctl net.ipv6.conf.enp1s0.accept_ra=2
sudo sysctl net.ipv6.conf.enp1s0.accept_ra_rt_info_max_plen=64

Replace enp1s0 with your actual Ethernet interface name.

4.3 Make permanent

To make these settings stick, create or edit /etc/sysctl.d/ipv6.conf:

net.ipv6.conf.enp1s0.accept_ra=2
net.ipv6.conf.enp1s0.accept_ra_rt_info_max_plen=64

Apply :

sudo sysctl --system

4.4 Verify

After the next RA cycle (up to ~2 minutes), the route should appear :

ip -6 route | grep <thread-prefix>

You should also be able to ping Thread devices directly from the Home Assistant host and from inside the Matter container :

ping -6 -c 3 <thread-device-ipv6>

4.5 Matter server container networking

The Matter server container must use host networking to access the Thread IPv6 prefix. Bridge networking will not work. Ensure your compose file has :

network_mode: host

With no ports: mappings (this is not needed with host networking).


Troubleshooting

Instead of relating all of my screwups in narrative form, please use this table to learn from my mistakes.

Symptom Likely cause
Reboot loop, RCP capabilities error H2 not flashed or wrong firmware version
Build fails with esp_ot_wifi_* undefined Using esp-idf 6.x instead of 5.5.4
Build fails with OPENTHREAD_CLI_WIFI conflict Disable OPENTHREAD_CLI_WIFI in menuconfig
Linker errors for otPlatRadioEnableCsl Disable OPENTHREAD_CSL in menuconfig
"Your device requires a Thread border router" Phone Thread credentials not synced, sync via Companion app, see Part 3.3
Matter commissioning fails, "Network is unreachable" IPv6 routing not configured on host, see Part 4
Thread prefix route not appearing despite RAs arriving accept_ra_rt_info_max_plen=0, see Part 4.2
Border router on WiFi, host on Ethernet, no route Normal, solved by sysctl settings, not a bridge/AP issue